Sunday, December 31, 2017


Greetings for the New Year!

I hope you are getting excited for the new year and the release of Stampin' Up!'s Occasions Catalog and Sale-A-Bration Event. It is going to be tremendous year ~ Stampin' Up! celebrates its 30th anniversary this year, so I feel certain that we will all have many chances to celebrate with them.

But before the clock strikes midnight and calendar rolls over, consider some stampin' housekeeping before the new products arrive on your doorstep.

I do not want to say that I abuse my Stampin' Trimmer, but it does get a tremendous amount of use as the only paper trimmer I have; so I attempt to keep the surface clean of snail adhesive and liquid glue goo ~ I usually use my silicon craft mat for all of my work, as I am sure you do as well, but sometimes I get in a hurry, or behind ... 

Give your trimmer a good wash down, as well as the cutting mat and the plastic slide/ruler for the blades. I use alcohol wipes to clean the surface and plastic ruler. The trimmer mats do come out of their position and can be turned over. Dust and minuscule bits of paper get trapped in the mat. If needed, add replacement mats to your next order. I always have a spare pair of cutting blades on hand, too.

The alcohol wipes I use work wonderfully well on acrylic blocks; now is a good time to get them cleaned up for new year stampin', too. Try cleaning your bone folder, paper snips and piercing tool while you are at it.

I recently cleaned my Stampin' Scrub ~ just in the kitchen sink under running water, drying it in the dish drainer. 

How about your Big Shot Cutting Pads? Are they clean? Fairly flat? Try to rotate the pads occasionally to help keep them flat. Flatter pads hold framelits to the magnetic platform easier. Having a spare set of pads is a good idea.

Once everything is in terrific working order, stamping becomes even easier and more enjoyable.

The cleaning and supplies take little time and little funds.

Organizing ~ now that's a different matter, but something to consider as you prepare to begin ordering from the new catalog. Take stock of what you already have and make a list of what you need to replenish. As you look through the new catalog at the gorgeous Designer Series Papers, stamp sets and kits, check that you have the coordinating colors of cardstock and ink or refills. 

Cheers! Let's stamp in 2018! 
Monday, November 27, 2017

Quilt All Year with Quilted Christmas and Stampin' Up!

A 101 years ago one of my best friends taught me to quilt. Her grandmother quilted, as did her mother, as did she. I admired all of their handiwork as well as those countless women I never knew, but either lovingly touched their quilts or bought their quilts to keep my young family warm.

At the time I was living in the Midwest in a somewhat country environment and surrounded by Amish communities. I took every chance I could get to venture out to fall weekend festivals and obscure antique shops 'just looking' for quilts.

When I decided I wanted to try sewing one myself, I labored over the calico choices in the fabric store ~ literally labored as I was expecting my second child! With primary colored calico selections, 'Garden Green' green for the sashing, fluffy white batting and thread and needles, I was prepared for my first quilting lesson. I had also decided upon the relatively simple nine patch pattern and the size of a baby quilt.

I completed it all by hand; it blanketed my youngest and it has moved with me and is now safely stored, but readily available as needed for any visiting baby grand. (I tried a few additional quilts, with varied success.)

Needless to say, I was delighted when Stampin' Up! introduced the Quilted Christmas Suite. It is the first suite shown in your Holiday Catalog, and it was the very first holiday item I purchased!

DSP  and ink for fabric ~ framelits for templates ~  paper trimmer for scissors ~ snail for thread...


Choosing the pattern is simple, but the 'fabrics,' well that's still a little labor intensive, only because I love it all. But, I can have it all! With all of the items in the suite, I can stitch, quilt and even applique.


I particularly like this sweet and joyful font!


As always, I look to the many talented demonstrators and crafters online and in my cyber communities, my upline and downline and the catalog for inspiration and a starting point. The combination of talented artists and SU materials always equals success.

I have many more Christmas cards to make with this suite, but the incredible beauty of this suite is that it does not have to be ~ should not be ~ limited to Christmas!  I used it for Thanksgiving: 


And I copied a design that I thought was interesting and not particularly holidayish:


Can you see that needle and thread? Created with die cuts and the coordinating framelits. 

This is just too much fun!! 

Although you can use this suite of products all year long, the products are only available through the end of this year!!  Join the fun and we can create a virtual quilting bee!

Monday, November 6, 2017

Tell them thanks

Tell them thanks...


Please don't put away your fall and Thanksgiving stamp sets yet! I know everything in the stores is beginning to scream Christmas, but let's not forget about what just may be the least commercialized holiday of the year. 

I love autumn! We have stamp sets and dies and papers and embellishments and embossing folders that make for beautiful fall cards. Stunning cards. Handsome cards. What a lovely way to say 'thanks.' 

I will be happy to help you design a card if you like it - just ask! 

Please don't let this season of gratitude slide by without
telling them thanks! 


Wednesday, September 13, 2017

Bonjourno!

Bonjourno! The ship is rolling just a bit as we are making our way from La Spezia (our port for Florence and Pisa) to Civitavecchia (our port for Rome), but I think I can still type.


With these breezy days in the seventies on the Mediterranean. it is tough to consider the holidays and how quickly they are approaching. But before I left home on this much anticipated cruise with my husband, I did spend some play time with some products from the new Holiday Catalog.

I started out with two Designer Series Paper offerings : Be Merry (annual catalog page 113)

and Quilted Christmas (holiday catalog page 5). You know I love paper!

And although I did have the holidays on my mind, I was just playing and...

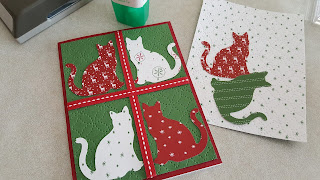
I picked up the new cat punch (have you found that in the holiday catalog?) and began punching out calico and gingham kitties.

Thinking of quilts, I chose different papers for cats and background and sashing and juggled them around a bit. I embossed several options for the background with the Quilt Top Textured Embossing Folder ~ solids and patterened papers. Then, I couldn't decide which side of the embossing I preferred.


I will say that embossed white or white with small and sparse patterns look a little like Northern Quilted Bath Tissue. I opted for a darker, almost-solid colored background for my paper quilt.

Not being the swiftest with numbers, I cut and embossed a piece of DSP measuring
5 1/2 x 4. Then I simply placed four kitties fairly evenly spaced on that layer and used 1/4" ribbon as the 'sashing.' And it worked! I could then layer that onto a standard card base of 5 1/2 x 4 1/4. Heavy cardstock is quite useful here.

So, I have not completed my cards; still playing, but I have lots of ideas, and not all Christmas...

Maybe another glass of wine will inspire more ideas.

Ciao!


Wednesday, August 2, 2017

Watercolor Tricks

After two attempts I was finally able to make a watercolor class with my fabulous upline. (My foiled attempts were because of dental work which resulted in a bit of discomfort.)

I purchased the watercolor pencils as soon as they were released last year. I just love playing with those pencils, along with aqua painters and blender pens. And there are so many stamps and papers that lend themselves to use with those tools.


In my class I learned two ways to lay down color for two different looks.

I think it is instinctual to color lightly with the pencils - fear of breaking the points and the well known rule 'you can always add color, but you can't take it away.'  So when I was instructed to color heavy, I re-colored several times.


The bottom, vivid image was stamped in Archival Black ink on watercolor paper and then colored with pencils - darker colors out to lighter on the tips of the petals. The object was to lay down thick color. Then, the image was spritzed with water, allowing that thick coloring to bleed. The result was stunning!

I will layer this on a slightly larger layer of Basic Black cardstock and then onto a card base of Rich Razzleberry!

Did you notice that small scrap of white paper in with my pencils, which I store in a  thin stamp case?  It was used as a palette - I colored, heavily, a circle of Calypso Coral. Then I used an aqua painter to pick up just a bit of the color - that light shade provided the perfect skin tone for the Beautiful You gal dancing in the water - top card! It really is just a kiss of peach - you'll have to take my word for it - try it!

I put down a circle of Bermuda Bay and again used an aqua painter to pick up the color and paint a thin shadow line around the gal - neat effect.

I am going to spend more time with these two techniques!!

Tuesday, July 18, 2017

Who Doesn't Like to Play in Water?

It seems universal, children love to play in the water, for the most part.


The water hose, washing the car, watering the plants, water fountains, a stream, the ocean, the bath tub (except for washing hair), swimming pools ... and now there are children's play fountains in parks and gardens and amusement venues.

I could fill this blog with pictures of my children and grandchildren playing in the water. My water play was in a ringed plastic wading pool or in the sprinkler, but not in the front yard! Mama would not have children in bathing suits in the front yard!

Play for me today is water and ink!


I truly love the watercolor options that Stampin' Up! has given us: aqua painters, watercolor pencils, watercolor paper, shimmery white card stock ... they can make an artist out of any of us.

Although there is nothing really hard about ink and water, first attempts may not result in what was anticipated. Like water, sometimes you must go with the flow. I have read many blogs and viewed videos to glean tips that may produce my desired effects.

Aqua painters and markers is probably as close to controlled as you can get with the watercoloring techniques. On the top left card I scribbled Stampin' Write markers in three colors and then painted with water right over them - using an aqua painter.

I found this card and the alluring blog title "Three Step Watercolor Wash" from Natalie Lapakko/stampwitch.blog.  She very succinctly instructed to  1. scribble colors, 2. apply water from aqua painter and 3. splatter water from aqua painter onto colored area (to create bubbles, texture, interest) and blot with paper towel.

AND it worked. First time! I  love it when things work the first time around!!

She also used a bit of the new Copper Trim for accent; I used some to ground the piece, almost like sandy shore, I suppose. The ribbon can be stretched out to suggest fishing nets, chicken coop wire, sand ...

Not only did I enjoy creating this, but the gals in my classes did as well. Thanks Natalie!

I used the Shimmery White Cardstock for that art piece. And then moved onto Stampin' Up!'s Watercolor Paper for the canvas sling beach chair in the card on the right, a design by Mary Brown at stampercamper.com.

I found the SU watercolor paper too thick and textured for stamping, so switched over to the Shimmer White again.

The watercolor background was created with one of our acrylic blocks ~ ink the block up with several beachy colors (all at once), spritz with water, stamp it onto the paper. HOLD block down, or weight it down for a bit so that color is absorbed into the paper. Pulling the block up immediately causes the water and colors to run downhill like a mudslide. Thank you Mary for that advice!! I had previously produced many mudslides and decided that I could not handle this technique.

I will say that I continued working with my initial stamped image on the the heavy SU watercolor paper. I added a little color with markers, added water with the aqua painter and I like the result, but I did not try stamping a sentiment onto that heavy paper ~ just left the beach scene as a mini watercolor masterpiece for myself.

Don't be afraid; go ahead and play in the water!

Saturday, July 8, 2017

Who has bonus dollars?

Me!

I already have $10 in Bonus Dollars and it is only the 8th of July!

You know the deal for Bonus Days, right?

For every $50 order you place in July, you will receive $5 to spend in August, on anything you'd like, INCLUDING a new pre-release holiday bundle, Carols of Christmas!

How did I get $10 in Bonus Dollars? I spent $100 on product yesterday. 

It has really been rough beach weather this week ~ horribly hot and humid, blowing and stinging sand, biting flies and 
So, I had a lot of time on my hands and a Stampin' Up! catalog close by. 
Maybe I should have picked up the novel I have just started,  Savannah Breeze. It's an older one by Mary Kay Andrews, my favorite of the Queens of the Beach Reads authors. 

Although the skies were threatening with thunder and lightning and gusty winds, no precipitation,  just the loss of power for a bit.

All's well that ends well.

But oh, more Bonus Days details: collect as many $5 certificates as you can this month ~ you can use them all on one or more orders next month. They do expire, however,  they must be used during August.

When your order qualifies for Bonus Dollars,  Stampin' Up! will email you certificate codes to redeem.

HOLD ON TO THOSE EMAILS.

Save those emails because I will not get a copy of them .  The codes will not be re-mailed.

So, happy shopping. What's at the top of your list?

Thursday, July 6, 2017

Double Daisies

There is so much you can do with the Delightful Daisy Suite, especially as the Designer Series Papers feature both bright and bold colors and patterns as well as subtle and sweet colors and patterns.

The colors included are:

Calypso Coral    Daffodil Delight   Night of Navy   Old Olive
Pool Party   Tranquil Tide   Whisper White


I mentioned my wedding flowers and colors in the previous blog, and this card reminded me of those:


I am afraid that I just could not get a shot that really showed the colors ...  

I borrowed this design from Lori Pinto at lollpoppaperandink.com. 

I love the softness with the watercolor feel and ink colors of Calypso Coral and Pool Party and a swirl of Daffodil.

Again, the paper does the work. The DSP panel of 4" x 5 1/4" is simply 1/4" smaller than the Whisper White base card.

The largest square in the Stitched Shapes Framelits is wide enough for this sentiment found in the Daisy Delight Stamp Set ~ Your thoughtfulness brightened my day. I stamped it in Calypso Coral toward the top of the square so that I could wrap new matching ribbon ( 1/8' Sheer Ribbon in Calypso Coral) - three times around.

The daisy was created with two stamped and punched daisies - one stamped off in Calypso Coral and the other stamped off in Daffodil Delight. The daisies are offset so as to create a fuller blossom and accented with a new gold Faceted Gems. 

For dimension I layered the daisy onto the stitched square and popped up the square with Stampin' Dimensionals.

Change out the sentiment and you can easily have a Thinking of You card, a sweet Sympathy card ~ any all occasion card! 

If you have any questions, please ask. 

Let's stamp!

Tuesday, July 4, 2017

Daisy, Daisy

What could be better than a combination of a perfect punch and oh-so-gorgeous Designer Series Paper? Not much, at least not in my Stampin' Up! world!

If you have read any of my posts or seen any of my cards, you know that I am addicted to paper. When I as able to preview the new designs at Stampin' Up!'s OnStage gathering for demonstrators last spring, I fell in love with the nostalgic Birthday Memories papers ~ the entire bundle ~ but it was those papers with the sweet little girl and the parade of animals!! And with thinlits that matched the characters ... I was melting in front of that display kiosk.

And then I saw the Daisy Delight Papers. Does anyone not like daisies? Perhaps it is not your favorite flower, but the sweet and simple, cheerful daisy always makes me smile.

One birthday Mama gave me a lovely little etched glass pitcher filled with daisies. I was overjoyed. Today that pitcher is filled with vintage buttons I have collected over the years.

My bridesmaids carried daisies, white and peach (101 years ago)  and the soft watercolory coral daisy design reminds me of those bouquets and the bridesmaids' printed and pleated peach floral gowns.

With such spectacular papers, cards are so easy to design; let the paper do the work!


Honestly, I owe thanks to Pinterest and friends for the above designs that I used for a recent Play Date. I believe it was the first class for which I relied on basically one stamp set ~I did add Beautiful You stamp set in there after a friend showed me how to 'dress' her with a daisy.

So since we are talking about dresses and I love paper dolls, let me show you more of the daisy dress.


I used the new Berry Burst ink and papers as the class was held just as the new catalog and InColors were arriving. Of course, use any color that you would like, or suits your needs. This is very Berry Burst with matching ribbon (1/2" Finely Woven Ribbon) and Fresh Florals DSP in berry, plus the berry Stampin' Write Marker.

I usually stamp and then cut, and layered two ovals from Whisper White and Berry Burst Card Stock.

The entire dress and hat were colored with Berry Burst. Either aqua painters or blender pens create attractive shading.

The 3D skirt was created with one stamped Berry Burst daisy on Whisper White and  punched with the new daisy punch. And here is where your seamstress skills come into play: cut apart the daisy into segments of three petals, two petals. two more petals and one left over petal.


I built my dress in layers right on top of the stamped image. My tip: take the three petal segment and place flat over girl's skirt and out stretched leg first, using your glue adhesive of choice. Then build up your skirt using the remaining petal segments.

Accessorize with diamonds or pearls at the waist.

Wink of Stella can add even more glimmer.

I added a strip of ribbon across the middle of the DSP panel and then popped up the berry oval with Stampin' Dimensionals.  And the entire panel was then layered on a Whisper White card base.

You are welcome to borrow this idea, colors and all, but play with your favorite colors and accessories ~ there are so many options!!


Wednesday, June 21, 2017

Chatting Over Coffee

Just about the only coffee I drink is the coffee my husband brews in the morning. The coffee is really just flavoring for my sweet milk, anyway.

I am a tea drinker - all day and all night, hot or iced.

I wish Stampin' Up! realized how important tea is to me and would have a teacup or teapot stamp set like Lovely As A Tree that never retires.  Perhaps we need another Tea Party Revolution ~ tea drinkers unite!

Nonetheless, I have just ordered the Coffee Break Suite (pages 30 & 31 in the new catalog).


It's not that I don't love the stamps and framelits and ..... I Do!

I like browns,  and I think they go with so many colors. In addition to the British Burberry pink and tan combo, I  like browns and reds together and browns and blues and I like browns and black even though my stylish daughters frown at it.

The Coffee Break Suite DSP features Pear  Pizzazz and Garden Green in combination with Early Espresso,  Soft Suede and Crumb Cake ~ delicious! (Seriously,  coffee and cake!)

I also ordered the Burlap Background Stamp (page 165) - another source of texture. I have burlap ribbon, plus I ordered the new 3/8" Classic Weave Ribbon in Crumb Cake. Oh, and the Corrugated Elements. I love texture!

I am anxious now to start designing.  The tall coffee cup stamp could be an iced tea glass - add a few stripes for a vintage look, or do a little paper piecing ( remember those aluminum iced tea glasses?)


My youngsters grew up with Slurpees from 7-11 in times when it was fairly safe enough to walk five blocks and cross at the light. Banana flavor,  lemon lime, berry ~ add a domed lid and straw .

Truthfully, these shapes would not be hard at all to fussy cut, but I will happily use the framelits. Bundles save you 10% ~ join my team of Nite Owl Demonstrators and save 20%!

I know I will certainly use this suite in upcoming classes ~ Hot & Cold?

And I think I will also begin a Cards and Coffee event in an area coffee shop. Will you come and join me if I do ~ sip a cup of your favorite brew and craft a card or two? Stay tuned.

I know you're going to want this suite, too. I will be happy to place an order for you ~ place an order in June, my birth month,  and I will send you a free pack of Basic Pearls, my birthstone! Let me know how I can help.

And keep drinking tea!

Let's stamp!

Wednesday, June 7, 2017

I am planning to love my LOVE TODAY planner

Seriously, how many planners does one need? Well, maybe need is not quite the word ...

Okay, I know there are many, many folks out there as addicted to their planners as I am to paper. Paper is the common denominator. Pens, markers, stickers ~ it all harks back to those childhood punch out sticker books. I get it. But for a planner?

I have tried to cutesy up - or decorate, I don't mean to offend anyone - but those squares are too little. I can't write and doodle and decorate in one tiny square. I need big squares.

I bought the biggest planner in the universe, with fair sized squares, with the intention of just playing with it - journaling, stamping, stickering ...  guess how far I got.

I am also a creature of habit, sometimes. I have had a a planner for three years that I really do use, and very frequently, until I go away on vacation and don't need it to tell me what's on the agenda for the week. There is one small issue I have with it, but it works pretty well for me.

So ~ here comes Stampin' Up!'s new Love Today Planner, plus refill!!


Guess what I ordered on June 1? Yeah, the planner.

The planner is beautiful - it's pretty paper, after all. The cover of the binder, the divider pages, the inserts - they are all SU gorgeous. They are undated so I can begin using it July 1, although I will be away, so maybe a little later. Really, I do not have my plan for it yet.

But what is somewhat amusing to me is the photo in the catalog. The person has very small and precise lettering, perhaps an architect. She obviously has no trouble fitting a seven item to-do list in a small space. My handwriting is not so small, nor precise and a lot of times I just don't write within the lines ...

And the most amusing thing to me about the catalog photo is what is on the gal's nicely bulleted to-do list: vacuum, sink & counters, toilets, mirrors. I am not an artistic director, but I would not have shot pages with those to-dos. And, they are not the kind of lists I make ~ "Crafting forever, housework whenever."

Let's stamp!

I am sure that I will be ordering many of these for my stamping friends and I would love to order one for you , too! Need a Demonstrator? I volunteer!

Sunday, June 4, 2017

Making progress with paper addiction

I don't usually invite folks to check out my trash can, although honestly,  my stampers always get a kick out of our can that automatically opens when you get within inches of the top!

Still, I don't encourage it.  But today,  take a look:


Those are scraps, scraps of Designer Series Paper and cardstock. Recognize any patterns? And I deliberately, but lovingly, tossed them out.

This is a big moment for me. Now it's not that I don't have any scraps left, I have two boxes of them. But I am becoming a bit more discriminatory about how much I keep. And then just this evening I saw neat posts of how demonstrators were using the leftover bits of the new colors to create most interesting cards to show off at upcoming new catalog open houses.


Ha! When I began taking stamping classes with my upline, she kept two cabinet drawers filled with scraps - one filled with DSP scraps and one with white and vanilla. When I  first opened that drawer filled with DSP scraps,  I  thought I had died and gone to Stampin' Up! heaven. I think I spent half of the afternoon rifling through those scraps, turning them over to see the reverse designs, probably drooling. And when she suggested I take some if I wanted, well... and now I have a scrap box all my own!

Meanwhile, now that Stampin' Up! has just released the new 2017 - 18 Annual Catalog along with five new InColors, I need to make some room for all the new papers, which will yield new scraps. I have not completely finished clearing and sorting and organizing  (in reality I probably never will), but I am making progress, depending on how you define progress!

Let's stamp!

Do you need a catalog, a Demonstrator, stamp classes ~ I am here for you!


Thursday, June 1, 2017

It's here ~ the new Stampin'Up! Annual Catalog


I love the idea that SHARING IS CARING, don't you?

There is soooo much that is new, even the carry over stamp sets look new in the new catalog. So, how do you see everything in the new catalog?

You can view the catalog on line directly from my blog/website: www.upallnightstampin.blogspot.com.  

I also have hard copies of the catalogs that I will be giving away at my upcoming classes and at my STAY & PLAY CATALOG LAUNCH on June 17.

So, brew a cup of tea or coffee, or pour yourself a cold one and look through the latest and greatest. Have a notepad close at hand and a very sharp pencil to keep track of your shopping list.

If you have any questions, need advice (or a personal shopper) - please ask!

Would you like to receive some of those items on your wish list for a little less than the stated price in the catalog? I have a couple of ideas!

I am ready to stamp from the new catalog - are you?

Let's stamp!

Monday, April 24, 2017

Shop till you drop

Stampin' Up! has just released the Retiring List, including not just stamp sets, but inks, embellishments,  accessories and Designer Series Paper.

As I am addicted to paper, I think it is important to always have a good supply of DSP on hand. Sometimes it's that little sliver or square of DSP that makes the card. All current DSP is on the retiring list. Some of it is on sale. But truthfully, SU DSP is always a great buy - quality paper, double sided, strong, smooth colorful with a capital C, and occasionally with a glint of foil.

Stampin' Up! just really makes the best papers. Buy it and use it!

Do you know where to find the Retiring List? From my website  www.upallnightstampin.blogspot.com, select Shop Now and then Retiring. But hurry, product is going fast. 

Shopping is one of my least favorite activities, chores,  actually.  Clothes shopping is the worst. I  need a personal shopper to help me with color and separates and sizes. Sometimes my daughters will help, thankfully.  They are usually brutally honest, and they are a good influence coaxing me to spend money on myself. 

But how frustrating to find skirts and no suitable tops. Or need a medium and all left are XS and XL. I just hate it!

I will, however,  shop for the grandchildren's clothes. Money is no object then and the sweeter the outfit the better. Even boy's clothes are fun to shop for ~ plaids and sweaters, sun hats and swim suits. Love it!

Give me an antique shop or a bookstore and I am in heaven ~ or used books in the antique shop or antique mall. Seriously, are there two more alluring words than antique mall?! Perhaps tea room, but it's  close. 

I can say that I  have absolutely no difficulty shopping in the Stampin' Up! catalog. Do you? Didn't think so!

You only have until May 31 to shop from the Annual and Occasions catalogs, along with the retiring list and the clearance rack.  I would find it hard to believe that you have bought everything from your wish list. Do check your list against the retiring list first. If an item is retiring,  jump on it! Please don't wait to see if it will be discounted.

IF you do indeed have all that you need,  great, because there will be one pre-release from the new annual catalog coming in May!! I will have all the details soon.

In the meantime, check your supply of DSP.  Don't  have any? Choose a package and begin to use it. Your card bases are usually 4 1/4 x 5 1/2. Cut a piece of DSP  4 X 5 1/4 room layer on the base. Then design and stamp on a piece of Whisper White cut to 3 3/4 x 5 ... layer it. Add some twine or ribbon or a few sequins... let that gorgeous DSP  shine!


Now, if you need a personal shopper for Stampin' Up!, I have got you covered! Allow me to get you started with stamps, inks and PAPER! And now before everything is gone!

Thursday, February 23, 2017

Oh, Happy Day!

One of the perks of being an Independent Demonstrator with Stampin' Up! is that several times during the year I  am allowed to order new, exciting products before friends and customers.

When I  first saw and then worked with the new Watercolor  Pencils,  I  knew they would be at the top of my wish list. Indeed, it was one of the first products that I ordered from the Spring Occasions Catalog.

I certainly was not alone in my excitement! I  also knew that you would love these pencils.


I  was also lucky enough to be given this new Beautiful You stamp set at a SU event for demonstrators. (Wouldn't you like to join my team of SU Independent Demonstrators?!)

Put Watercolor Pencils together with Beautiful You ~ such fun! Add Blender Pens and you can dress the beautiful gals anyway you wish! I outlined the dancing gal's dress in Bermuda Bay.  A Blender Pen fills in and shades the dress. (Inspired by and CASEd from klompenstampers.com)

One of the beauties of the Watercolor Pencils is that the package contains 13 pencils in Stampin' Up! colors.

There are just so many possibilities with the gals in Beautiful You, and as you must know by now how I still love paper dolls, paper piecing is just like playing with paper dolls.

Did you notice the umbrella on the second card?


There are lots of great stamp sets available just begging to be used with the Watercolor Pencils. AND with the special products offered during the Sale-A-Bration promotion, there is yet one more exciting opportunity - Inside The Lines Designer Series Paper. Think coloring books! Papers are printed in just black and white, ready to be colored with your choice of colors from the Watercolor Pencils.

Of course, you can also 'color' with Stampin' Write Markers, sponges, brayers, Aqua Painters...

So, let's color; let's paint; let's stamp!

Wednesday, February 8, 2017

Don't Be Scared

It has dawned on me that perhaps the word 'subscription ' scares you.

Are you afraid that you will want to cancel and won't get the cancellation notice in on time?

Are you afraid that you won't be able to find cancellation information?

Of course,  I am talking about Paper Pumpkin,  Stampin' Up!s monthly craft kit.


Right now I am working on January's Paper Pumpkin kit. It's a kit containing materials to create 24 - 24 mini Valentine's treat bags, complete with Cupid's arrows!

The bags are covered with gold foil hearts, lovely. Banners, pre-cut, are white cardstock and pink vellum! The included stamp set contains 8 individual stamps, among them are the sentiments I adore you,  love,  happy Valentine's Day  ...

There is just no way that these bags can turn out any way except gorgeous. You will be so pleased with yourself and the recipients will be over the moon!

So, back to the subscription... you may purchase one kit, or one month of Paper Pumpkin.  You can also purchase a three-month Paper Pumpkin,  for three consecutive months you will receive a different kit in your mailbox.

I have a month to month subscription ~ I gave SU my billing info and every month like clockwork,  I  get a notice that my Paper Pumpkin is on its way; it arrives around the 17th of the month and my bill is automatically paid with my bank card.

More than two years of Paper Pumpkin and I  have never missed a delivery and never had a payment problem.

Please don't let the idea of a 'subscription' scare you!

So, ready to give it a try?  Call me and I will get you started!

Saturday, January 7, 2017

I Love You

I promised another card with the heart die cut edge featured in the new Love Notes Framelits Dies set just released in the Occasions Catalog.


What do you think? Same die, but different DSP ~ Falling in Love, plus ribbon and lace and a little glimmer and a beautiful very vanilla 'sparkle. '

I  know who'll receive this one, and my plan this year is to get it out in the mail in time to be delivered by Valentine's Day.

But of course,  this same design can be used for other than a Valentine's card, right? Do you have someone that you'd like to surprise with it?

Love it!

Friday, January 6, 2017

Love Notes

I  still love to get Valentine's cards and I love to know that my littlest ones will put my name on their list of cards to make and send.  AND, I can't wait till they are old enough for us to make them together ~ actually, Colin is old enough this year.  Yippee!

Oh, I  know just what we'll use.

In the meantime, you must see this new set of framelits: Love Notes Framelits Dies - page 14 in the NEW Occasions Catalog- and what I  have just made with them.


and


Look at that great die cut border on the top card! That just makes me giddy! Of course, there is a die cut for that. It cuts and scores so that you can lift up the sides of the hearts. 

There is a small, matching heart in the set of framelits ~ I  used it to cut hearts from Sending Love DSP and just adhered them with snail (I may try the green Tombow  next card).

You cannot distinguish it in this photo, but there is a slice of matching DSP on the right side of the inside panel.The DSP comes in my favorite 6 x 6 paper stacks - 48 double sided sheets featuring 16 designs!! The papers are bright and cheerful Real Red designs.

But the framelits ~ the heart border and tiny heart are only two of the 14 dies in the framelits set. This set is just too much fun.

The bottom card features a small 3D envelope! Oh, my! I wonder how many of these I will make before it's all over. The die for the tiny envelope is in the set of framelits! And there is another sized envelope die, plus a note card, and hearts and arrows. 

And I  haven't even mentioned the coordinating bundle-able stamp set which I used, Sealed With Love ...

Please stop back by for more ~ I  have used that heart edged die 
for a completely different look and feel ...

Oh, let's stamp!